English
Integrating an Existing Store
Inkble currently supports direct integration with the most popular global e-commerce platforms, including Shopify, Amazon, Etsy, WooCommerce, and Wix.
Shopify
To connect your existing Shopify store, go to the dashboard, and in the left sidebar, select Setting -> Store, then click Add Store in the top-right corner:
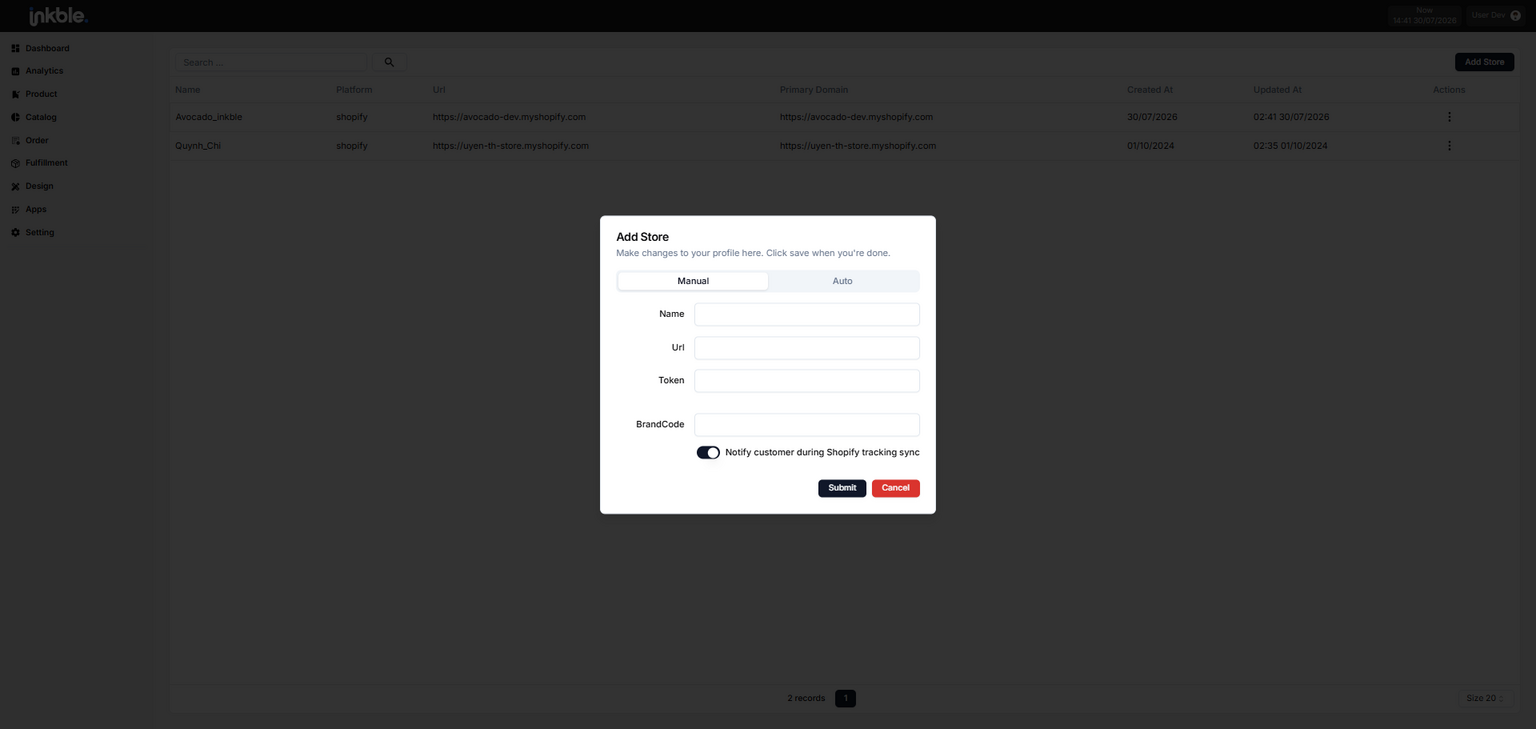
The Add Store window now has 2 modes, switched using the tab bar at the top of the form:
- Manual: manually enter a Token you already obtained from Shopify.
- Auto: connect automatically via OAuth using the Client ID / Client Secret of an app created on Shopify — no need to copy a Token manually.
Option 1: Connect a store manually (Manual)
On the Manual tab, you’ll see a form requiring you to enter the following details:
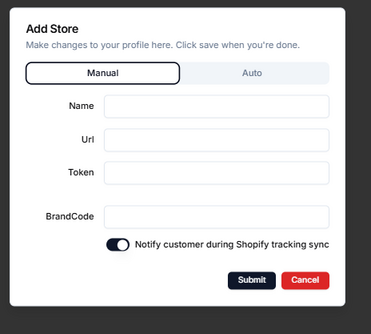
Fields:
- Name: Your store name
- URL: The full URL of your store on Shopify (this is the original URL provided by Shopify)
- Token: A secure token from Shopify to authorize the connection
- BrandCode: a brand code used to classify/tag the store, optional
Once all fields are filled in, click Submit to finish, or Cancel to discard.
How to Get the Token from Your Shopify Store
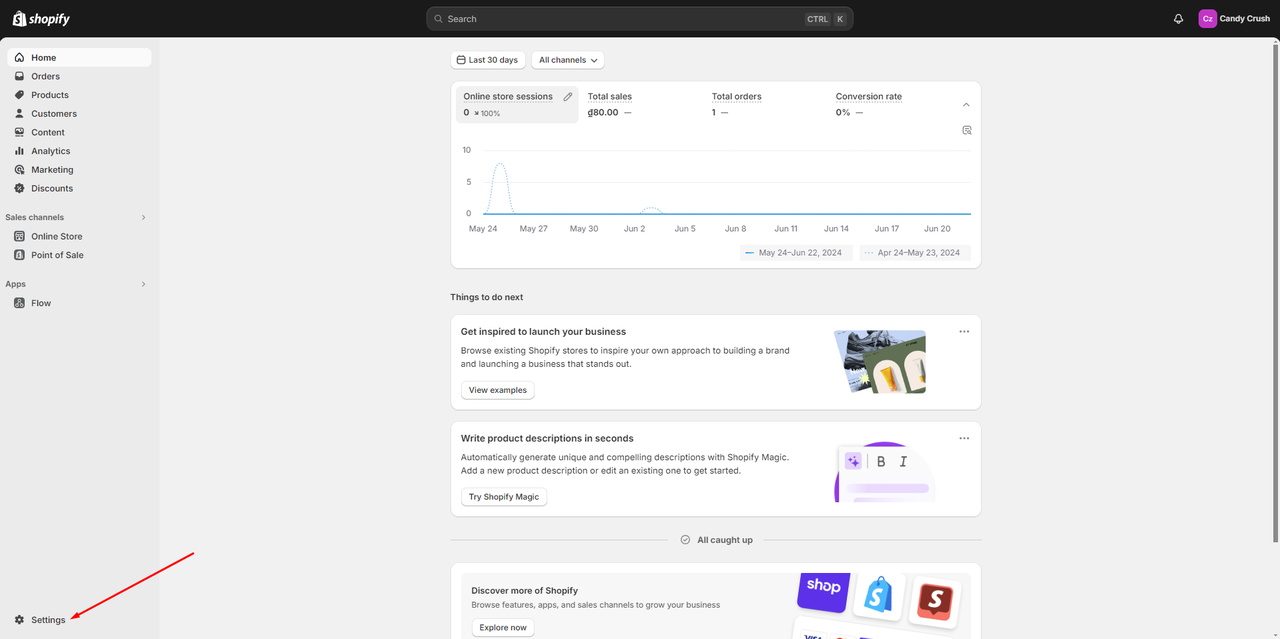
In your Shopify Seller Dashboard, click on Settings in the lower left corner.
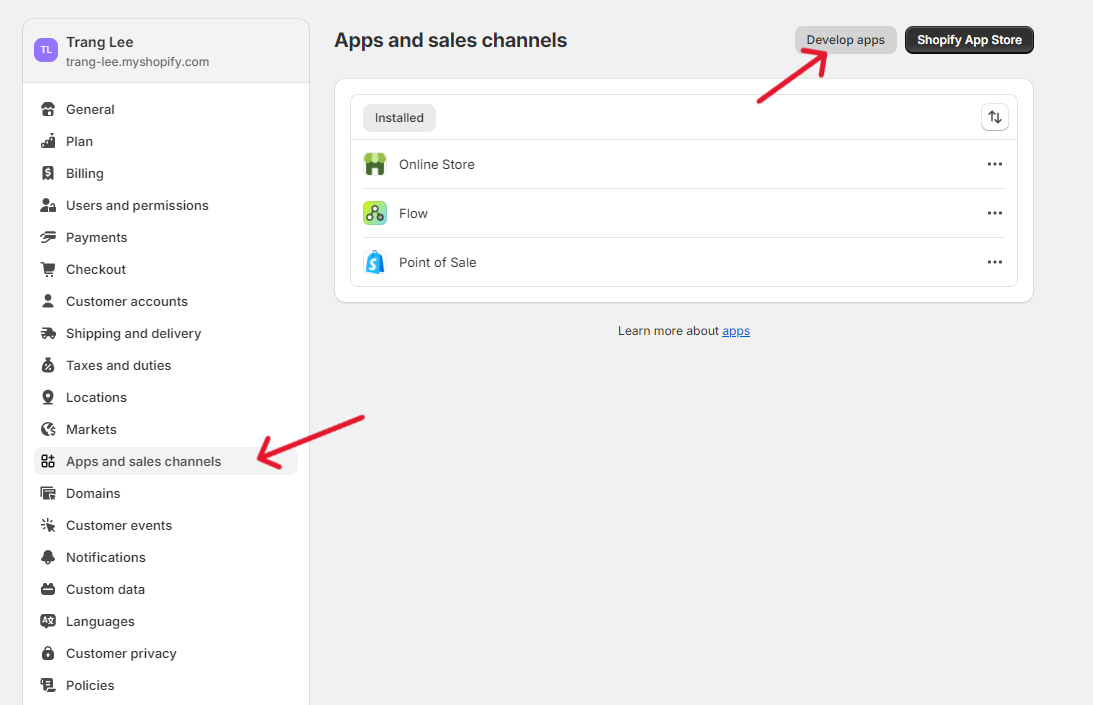
From the Settings menu, go to Apps and sales channels => Develop apps to start creating a new app.
If this is your first time integrating a custom app, Shopify will prompt you to allow custom app development. Click Allow custom app development to proceed.
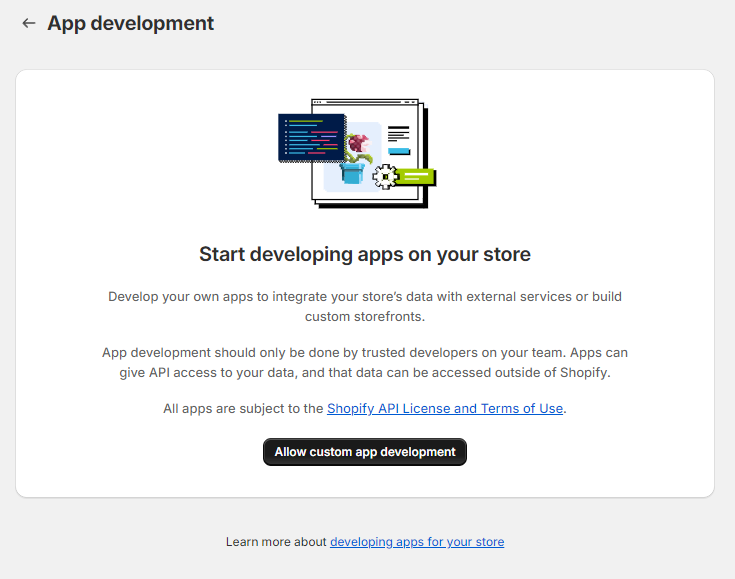
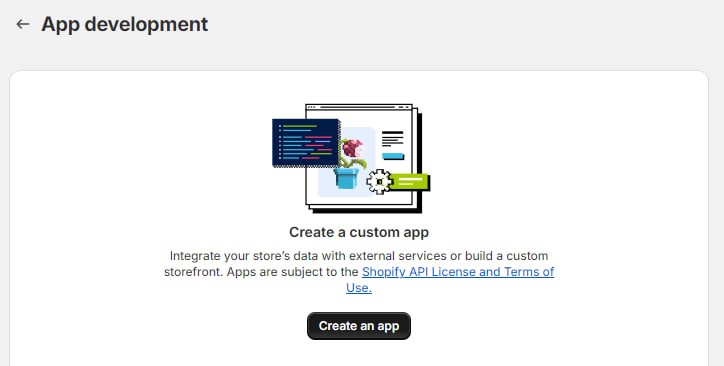
In the App Development screen, click Create an app.
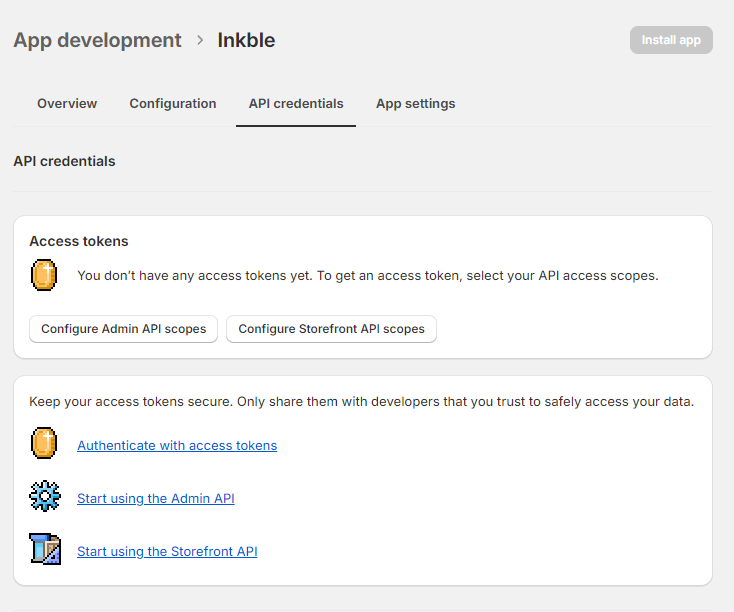
After naming your app, you’ll see the App Development interface like below.
Before installing the app, you need to grant it specific access permissions. Go to the Configuration tab and allow the following permissions:
Required Permissions:
- Products: Lets Inkble access your store’s product list to sync and create new products, and receive updates when new products are added

- Orders: Allows Inkble to sync order data and receive new order notifications

- Permissions for auto-updating shipping statuses:
- Assigned fulfillment orders

- Assigned fulfillment orders
- Fulfillment services

- Merchant-managed fulfillment orders

- Store content: Allows the system to generate shortened product URLs

Once access permissions are set, go to the API credentials tab to install the app.
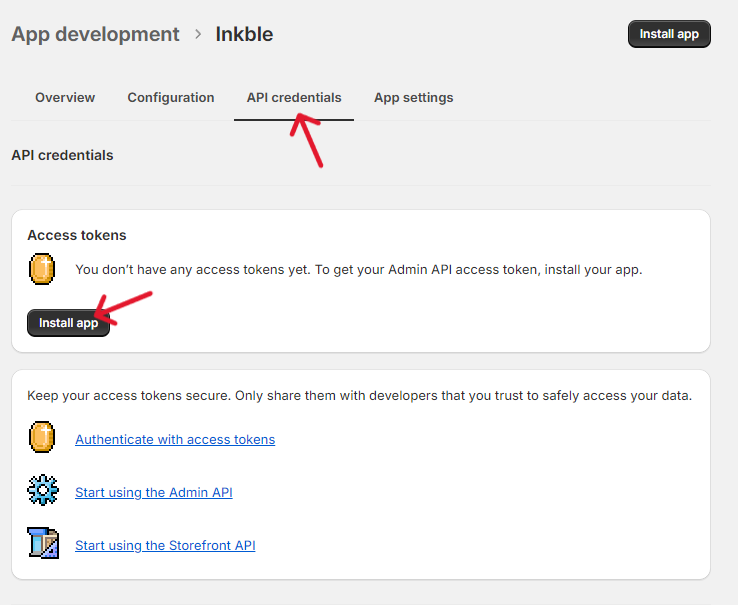
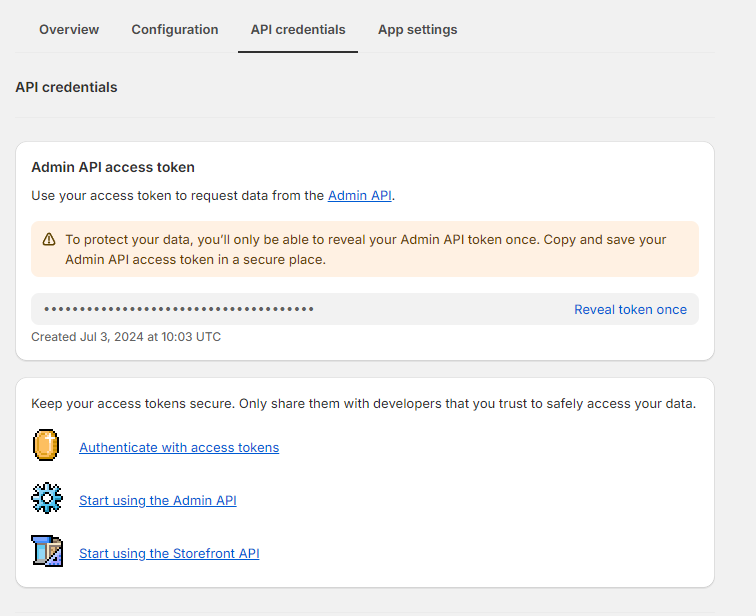
Now you'll see the token as shown. Click Reveal token once and copy the token. Paste it into the Token field in the Shopify integration form shown in image 4.
Note, the token can only be displayed and copied once, after you have integrated the app on shopify and want to reuse the app, you must click Uninstall app and perform the app integration process again.
Once all information is filled out, click Submit to complete the store integration.
After successful integration, your store will appear in the Inkble dashboard like this:
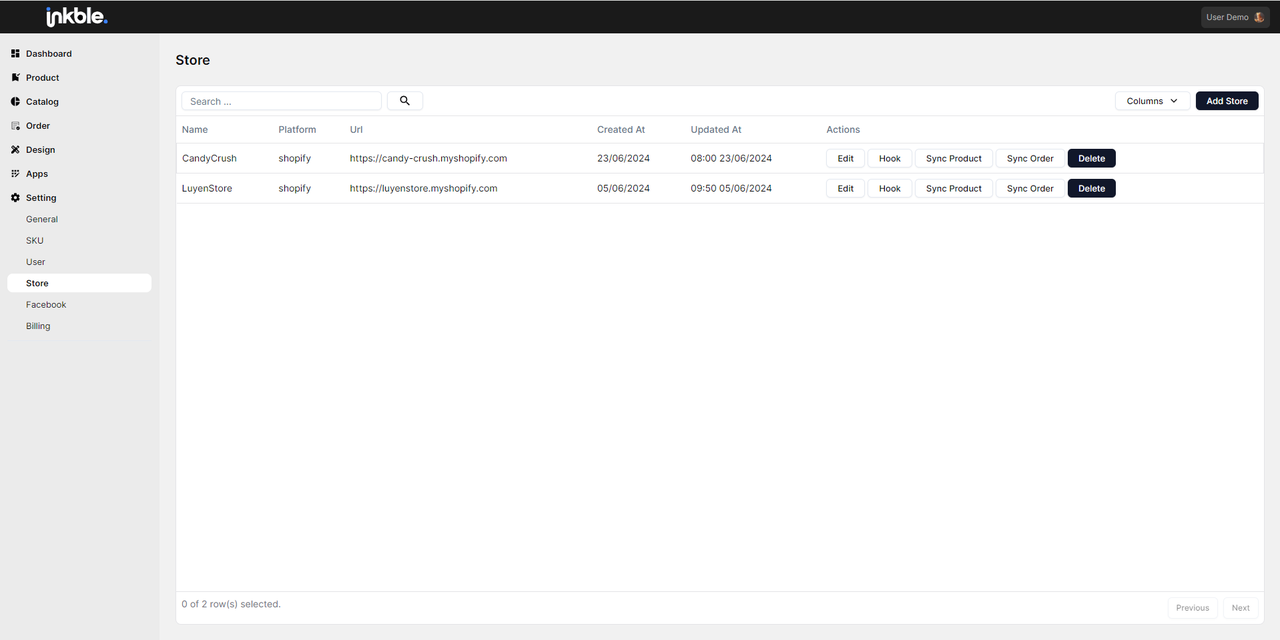
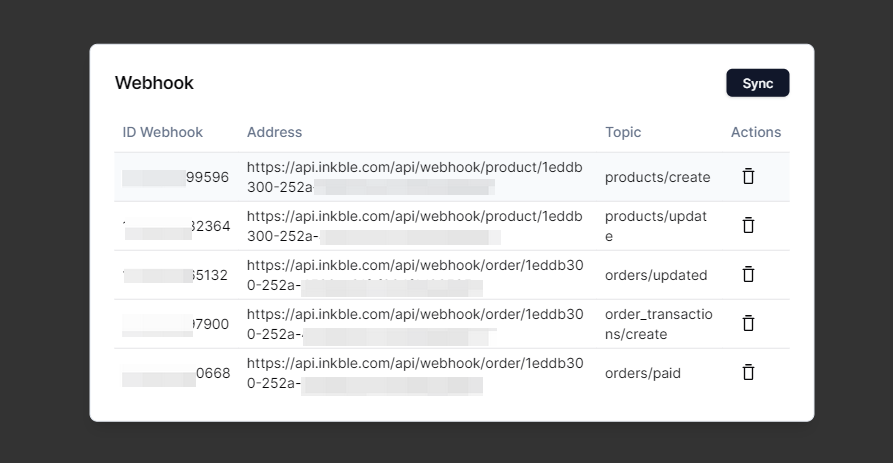
Note, after integrating the app, please check the Hook section of the store, because without this information, Inkble will not be able to receive information about products and orders on the store. To synchronize real-time new information of the store on the Shopify platform to the Inkble system, please select Hook => Sync.
Option 2: Connect a store by building an app in Partner Dashboard (Auto)
The Auto mode connects a store through an app created on Shopify, using the app's Client ID / Client Secret to create an API access request. Once approved, Inkble automatically receives the access token and completes the connection — no need to copy a Token manually.
Prepare the app on Shopify
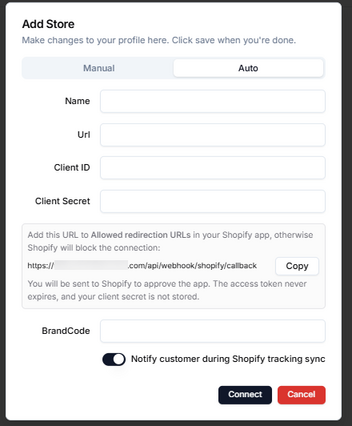
Before creating the app, open Inkble, go to Add Store, switch to the Auto tab, and click Copy to grab the ready-made Redirect URL — you'll need to paste it into the app you're about to create on Shopify.
In Shopify Admin, go to Settings in the lower-left corner.
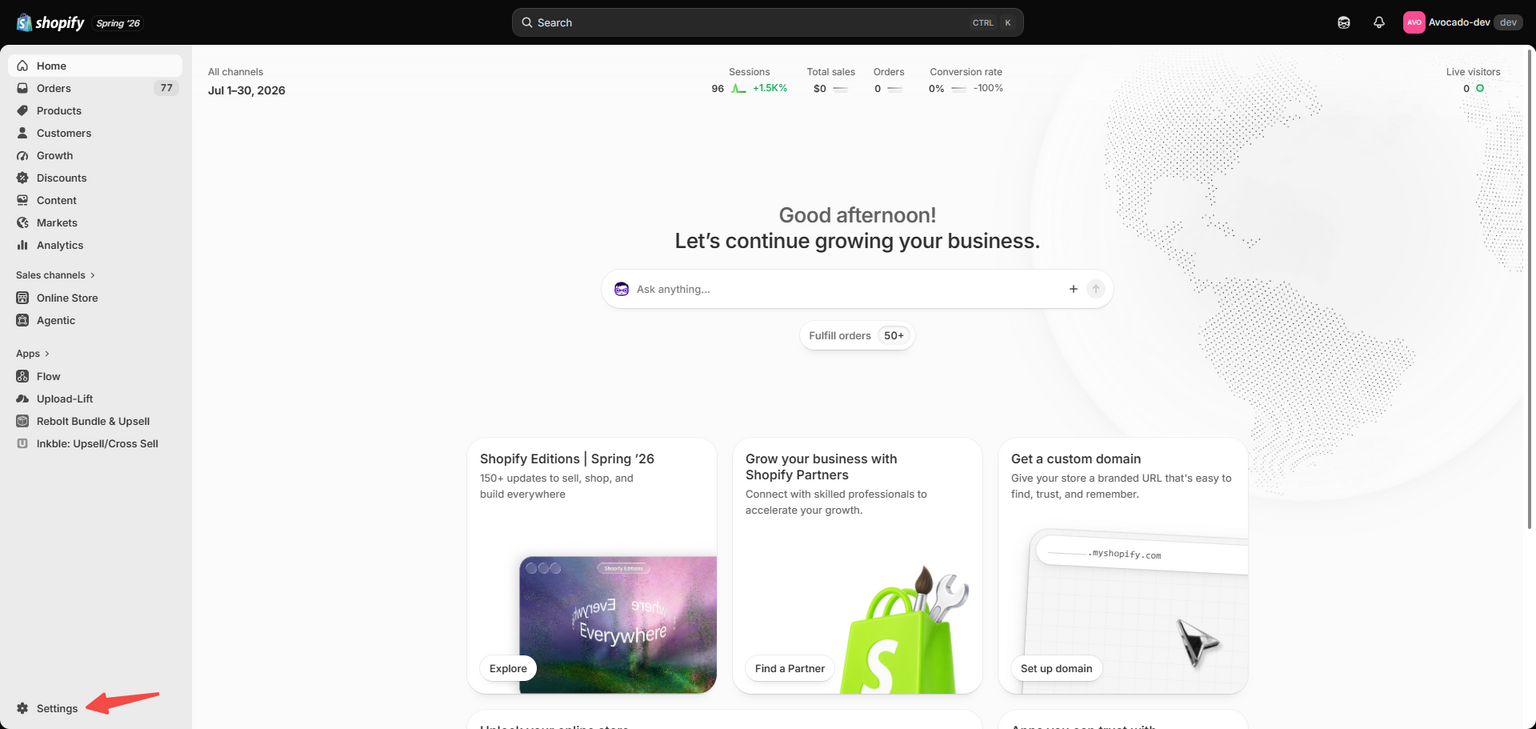
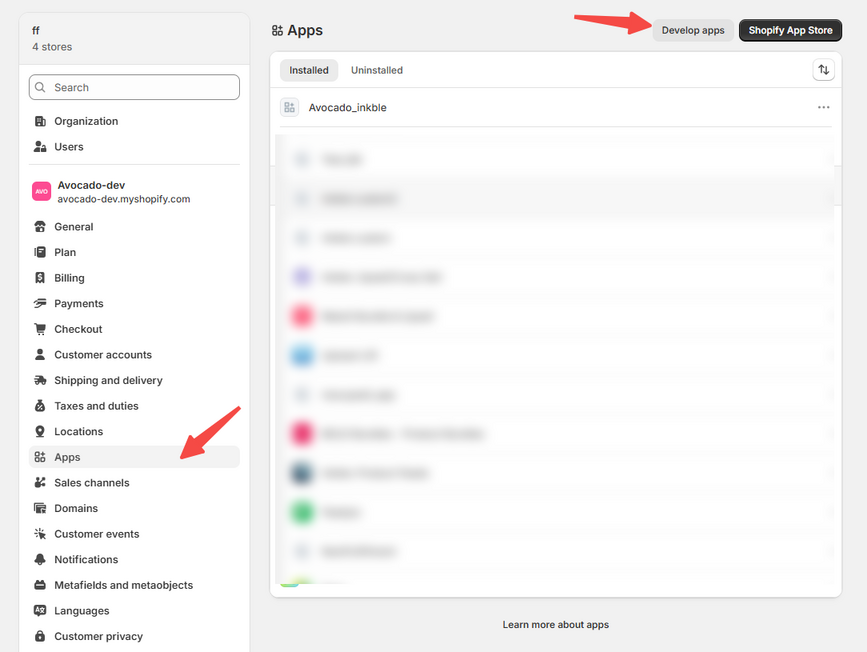
On the Settings screen, select the Apps menu, then click Develop apps in the top-right corner.
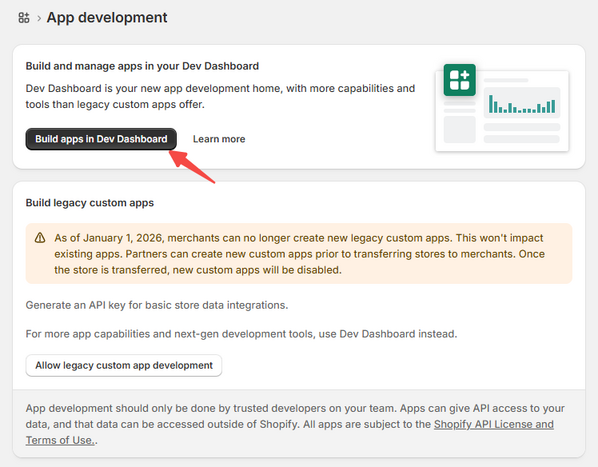
On the App development screen, click Build apps in Dev Dashboard.
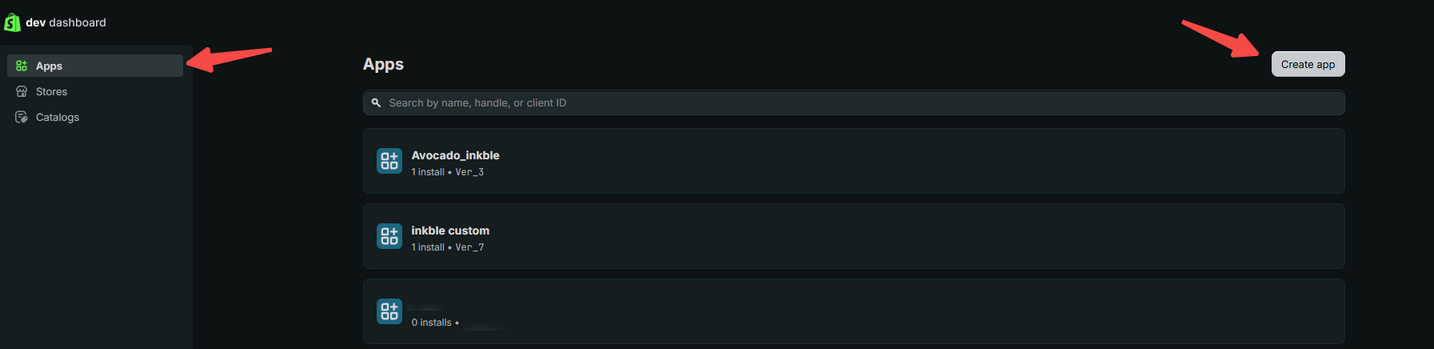
In the Dev Dashboard, go to Apps, then click Create app in the top-right corner.
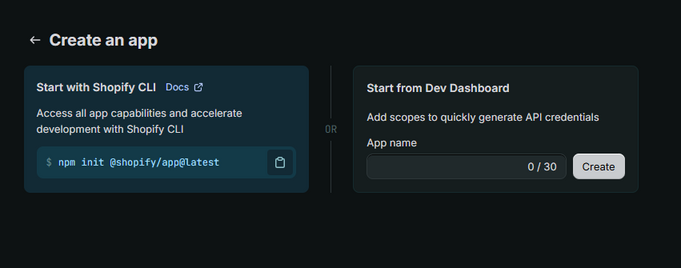
On the Create an app screen, choose Start from Dev Dashboard, enter an App name, then click Create.
After the app is created, on the version configuration screen (Create version), fill in the following:
- App URL: enter the domain portion that comes before
/api/webhook/shopify/callbackin the Redirect URL you copied earlier (e.g.https://<domain>) - API access => Scopes: it's recommended to check Use legacy install flow to make sure the app is granted all the scopes it needs after connecting, or you can select individual scopes via Select scopes
- Redirect URLs: paste the Redirect URL you copied from Inkble earlier, exactly as-is
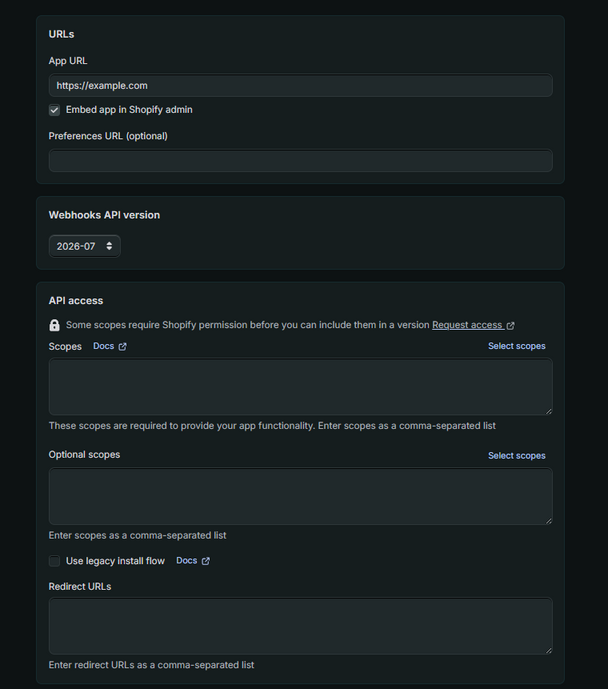
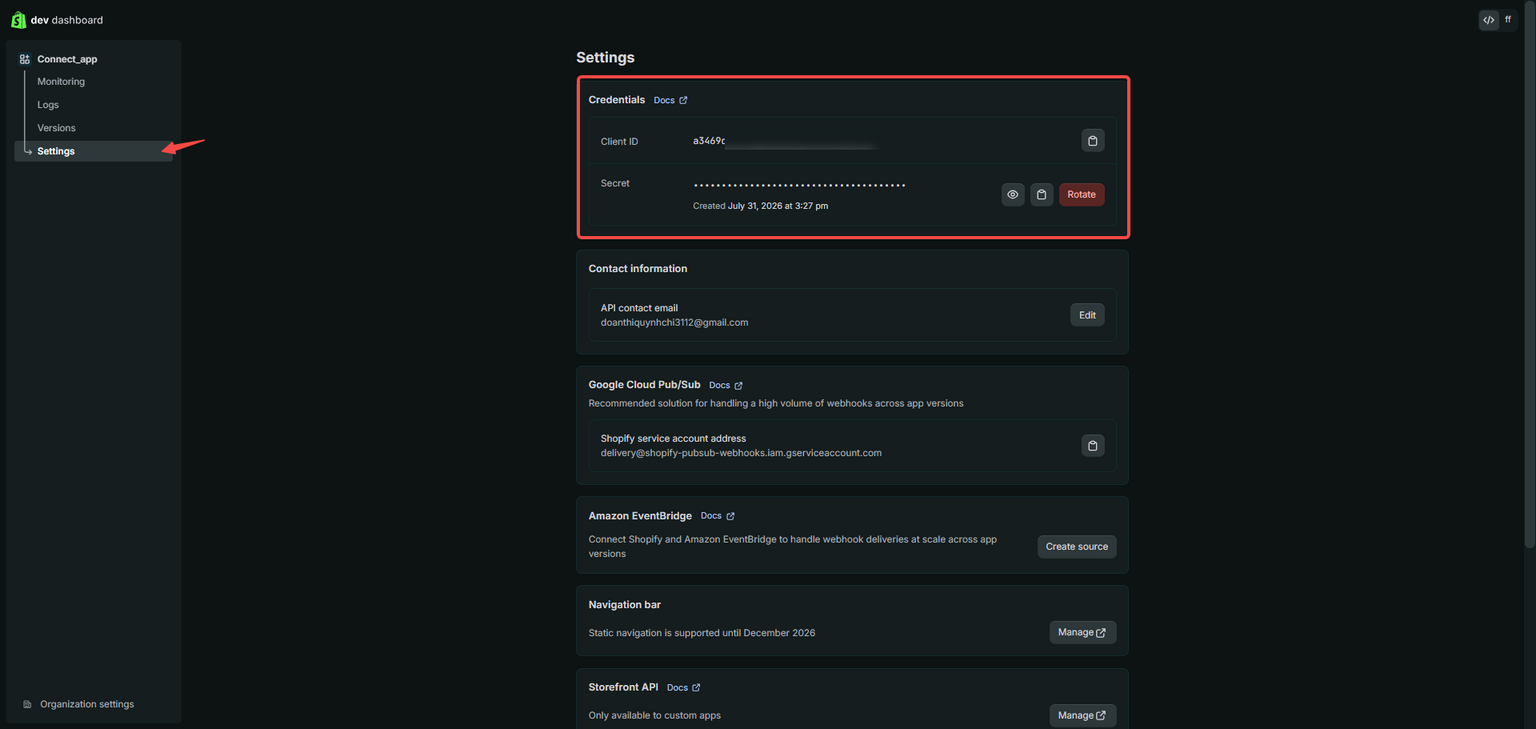
Then click Release to create a version. Next, go to Settings in the app's left menu to get the Client ID and Secret from the Credentials box.
Before going back to Inkble to connect, you need to submit an API access request for the app in Shopify Partner:
In the Shopify Partner Dashboard, go to App distribution => All apps, select the app that has been released (Distribution) on Shopify.
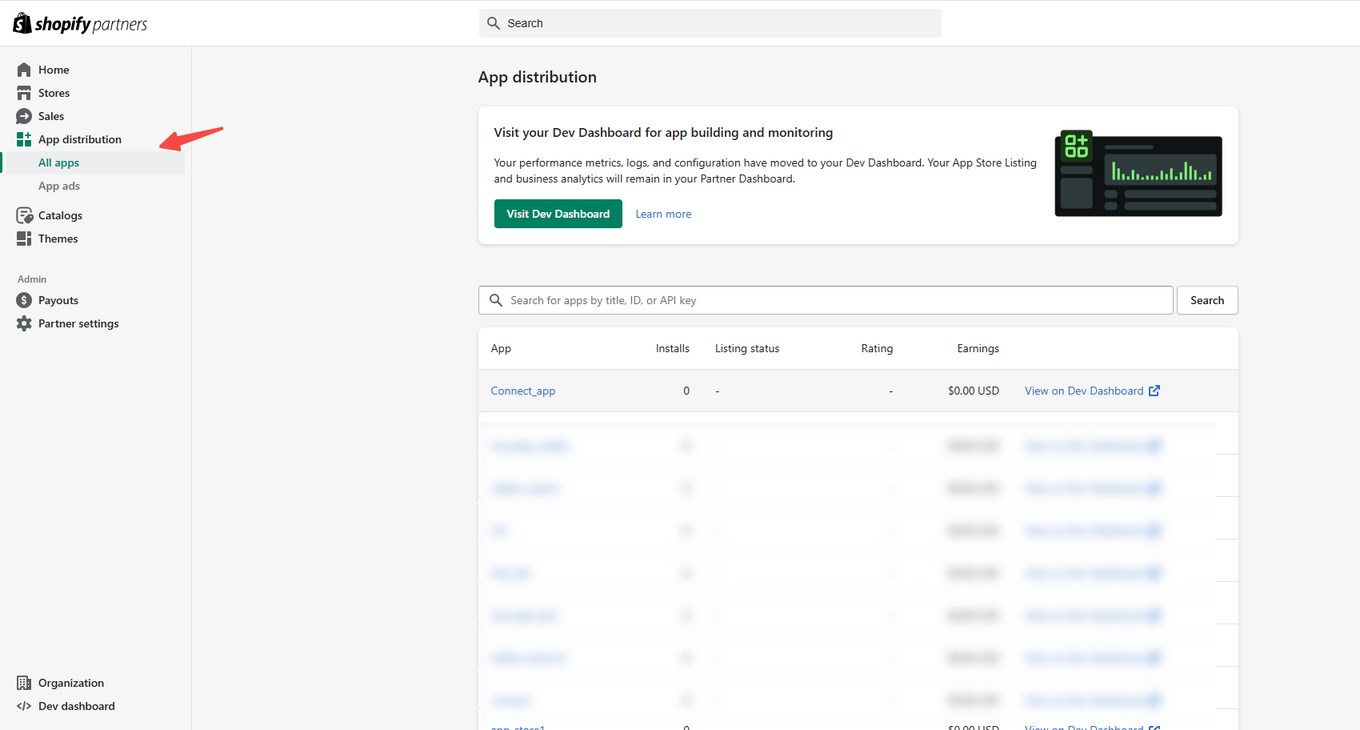
Then open the API access requests tab and click Request access.
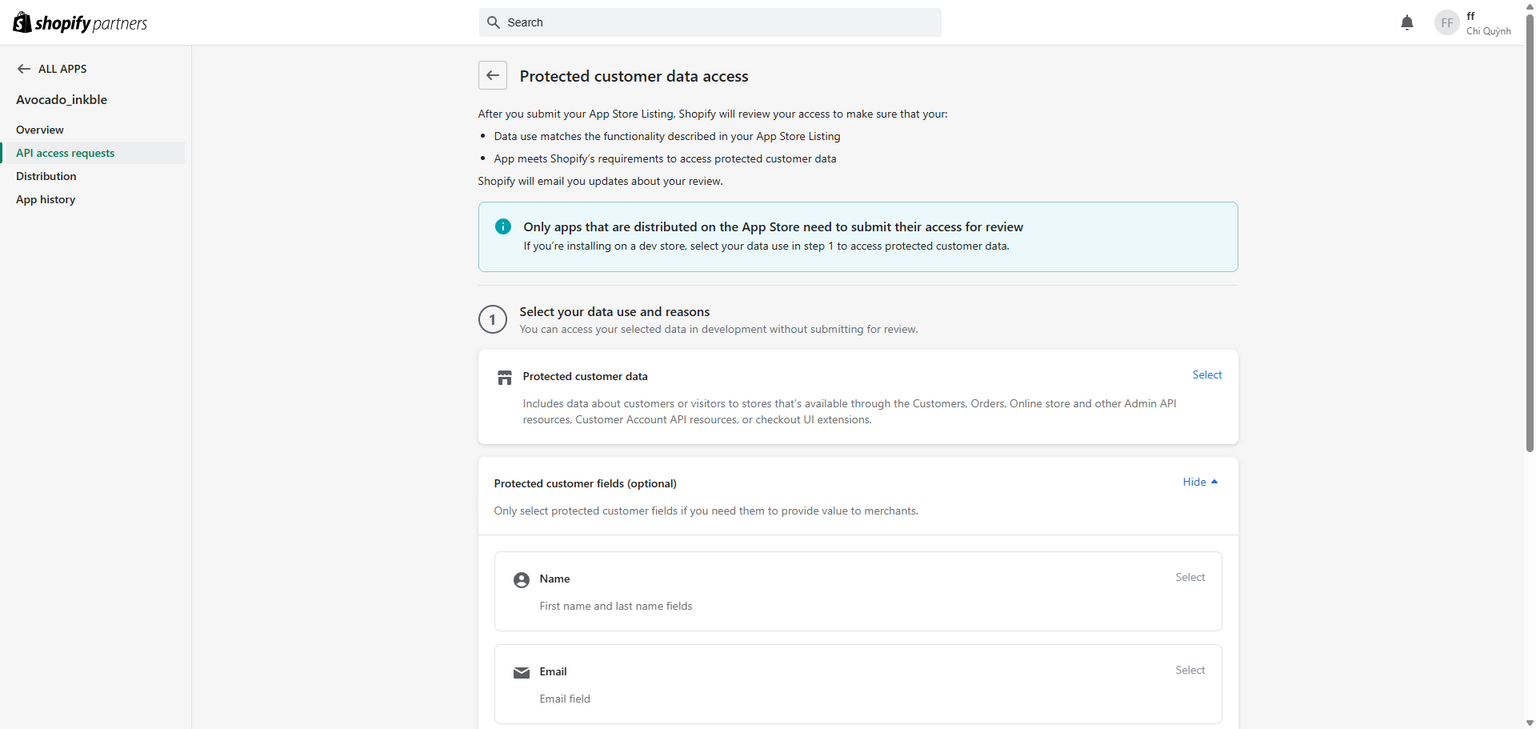
On the Protected customer data access screen, fill in all the required information: choose a Reason for Protected customer data, complete the Provide your data protection details section (answer the questions under Data protection details), then click Save.
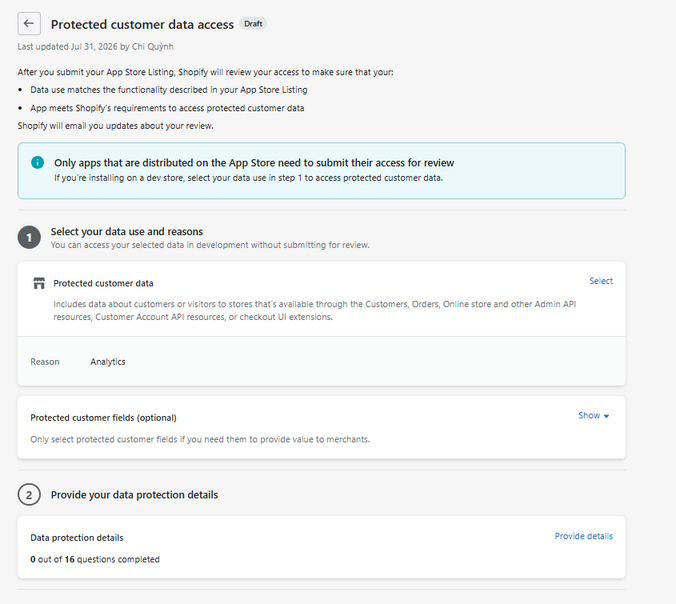
After submitting the request, wait for Shopify to review and approve the access before moving on to the Connect step.
Add the store on Inkble
On the Add Store screen, switch to the Auto tab:
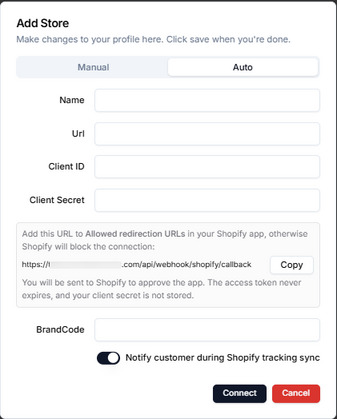
Fields:
- Name: Your store name
- URL: The full URL of your store on Shopify
- Client ID: the Client ID of the app you just created on Shopify
- Client Secret: the Client Secret of the app you just created on Shopify
- BrandCode: a brand code used to classify/tag the store, optional
The form displays a ready-made Redirect URL (in the form
https://<domain>/api/webhook/shopify/callback). This URL is unique to each Inkble account — click Copy and paste it exactly as-is into Allowed redirection URL(s) in the app's configuration on Shopify. For the App URL field, enter only the domain portion that comes before/api/webhook/shopify/callback(e.g.https://<domain>). If either field is set incorrectly, Shopify will block the connection.
Once the Redirect URL is set on the Shopify side, go back to Inkble and click Connect. If the app is fully configured, the system will automatically complete the connection (no further login/approval needed) and switch to the Webhook screen:
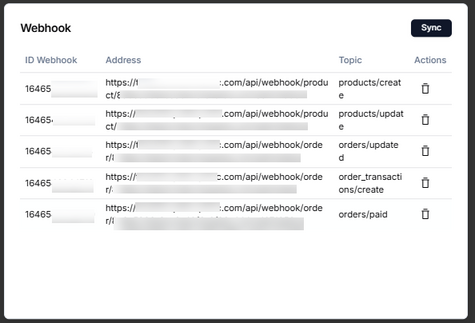
This screen shows:
- A Sync button to re-sync webhooks if needed
- The list of webhooks created automatically (Webhook ID, Address, Topic such as products/create, products/update, orders/updated, orders/paid...)
- A warning if the store's token is missing scopes, listing the missing scope names
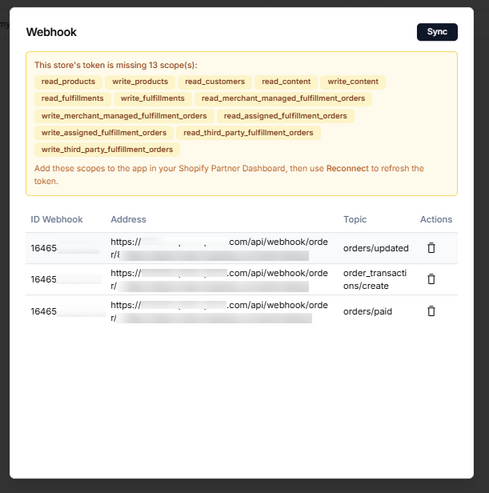
If you see a missing-scope warning, add the listed scopes to the app by going back into the app in Dev Dashboard, creating a new version that includes all the missing scopes, clicking Release to apply that version, then going back to Inkble and clicking Reconnect to refresh the token.
If you encounter any issues with integrating your Shopify store into Inkble, please reach out to Inkble Support via Telegram or Facebook for assistance.